Basic Timeline Cover Photo using Picasa: assumes basic working knowledge of picasa.
1. Open Picasa and pin/"hold" the photos you'd like in your collage
2. Click "Collage" to create a collage (a new window will open)
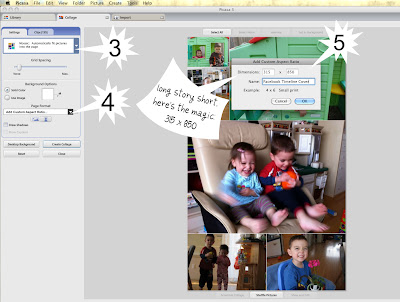
3. Select the type of mosaic/collage you'd like and play with the grid spacing, colours, etc
Here's where the magic happens:
 4. Under "page format," click the drop down menu and scroll the the very bottom of the list. Select "Add Custom Aspect Ratio" [a new window will open, shown as #5 in the image]
5. Change the numbers to 315 x 850; doesn't really matter which way you put them because you can play with orientation in the editing options.
You can continue to play until you get what you like; drag the photos around, or add and delete photos using the options on the left ("clips" tab), or use the "shuffle pictures" button below the collage. When you're ready, click create collage! **Note that the photo on the far left should have some space to accommodate your profile pic.
Then just head on over to your timeline and upload the new photo! You shouldn't even have to drag/adjust your cover photo.
Sometimes Picasa makes me "save to disk" before I get the photo that includes all edits including added text etc.
Happy Covering!


No comments:
Post a Comment