Thursday, April 26, 2012

How to create a Facebook Timeline Cover Photo using Picasa


Basic Timeline Cover Photo using Picasa: assumes basic working knowledge of picasa.

1. Open Picasa and pin/"hold" the photos you'd like in your collage
2. Click "Collage" to create a collage (a new window will open)
3. Select the type of mosaic/collage you'd like and play with the grid spacing, colours, etc

Here's where the magic happens:
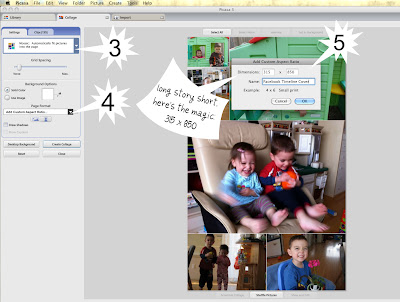
4. Under "page format," click the drop down menu and scroll the the very bottom of the list. Select "Add Custom Aspect Ratio" [a new window will open, shown as #5 in the image]

5. Change the numbers to 315 x 850; doesn't really matter which way you put them because you can play with orientation in the editing options.

You can continue to play until you get what you like; drag the photos around, or add and delete photos using the options on the left ("clips" tab), or use the "shuffle pictures" button below the collage. When you're ready, click create collage! **Note that the photo on the far left should have some space to accommodate your profile pic.

Then just head on over to your timeline and upload the new photo! You shouldn't even have to drag/adjust your cover photo.

Sometimes Picasa makes me "save to disk" before I get the photo that includes all edits including added text etc.

Happy Covering!


Monday, April 23, 2012


You don't have to wait for National Banana Split Day (Aug 25 supposedly?!) to whip up some healthy banana splits for dessert or even breakfast!

To make it healthy, use your favourite yogurt, fresh fruit, and top with fruit preserves or jam or even unsweetened chocolate. And what's a few sprinkles between friends to add a smile?

My original inspiration was here via pinterest: http://www.thekitchn.com/easy-breakfast-recipe-breakfas-154632

These are pinned to my YUM-O {sweet} board on pinterest, and currently in my freezer (I took this photo)... :) YUM-O!

Original idea source: http://www.onegoodthingbyjillee.com/2012/02/coolest-easiest-yummiest-yogurt-pops.html

though, truth be told, many of us have been having SOME version of this since we were kids... I just love the jam-a-stick-in-the-single-serve-container idea.

Though next time, I will pre-peel (and replace) the paper lid, so that it freezes on as kind of a drip catcher for the kids. Without pre-peeling, it may be tricky to get off, out of the cup, and paper back on to catch drips.


A friend on facebook adds this tip: "two sticks either side, so when they are frozen you can cut them in half... :)"

Saturday, April 07, 2012


  1. Start with your favourite Buttermilk Pancake Recipe
  2. Make some large circles and small circles (I keep things simple sometimes!)
  3. Add whatever fruit you have around for eyes, ears, nose, and whiskers... I used pears for eyes, bananas for ears (you could pour pancakes for ears too I bet), and strawberries for noses and whiskers.
  4. For an extra "treat" you can include your family's favourite treat on the side. These are Annie's graham crackers.

Smile and have fun with your kids at breakfast!

P.S. a quick buttermilk substitution: 1 TBSP vinegar to 1 cup milk (1 cup less 1 tbsp that is, so total liquid is still 1 cup)

PPS; don't be shy about celebrating a day early if things get kind of crazy on Sunday with church, family, egg hunt, etc